

This is a great scarf pattern (thank you, 1craftyboy, and all you Ravellers out there who have made it and shared it). It works up quickly and beautifully in all kinds of yarns. The only thing I don't like:

The ends don't match. That vaguely flower-shaped one on the left is the beginning of the scarf. The graceful scallop on the right is the end. It's not a big deal, but if you're adding a border to the scarf, then the disparity really gets obvious. Wouldn't it be nice if both ends looked the same, like this?
 |
| Modified pattern with matching ends. |
I thought so too. So here's the modified pattern, with tutorial. (Please excuse the lighting variations. I really thought I had it down.) Happy crocheting!
Scarf Tutorial
But first, a word from our blogger: Why, oh why, don't crochet magazines and websites CHART more patterns? When I see those endless paragraphs full of "dc in sc, *3 hdc, sk 3 st, sl st in 4th st, repeat from * to end of row, ending with triple salchow in v-st", MY EYES GLAZE OVER AND MY BRAIN SHUTS DOWN!
How much nicer to have a little picture that shows you exactly what to do. Like this:
 |
| Mrs. Micawber's Modified Queen Anne's Lace Scarf |
(Note to chart followers: 2 small mistakes have been found in the chart. See photos 11 and 15 below, and the instructions just above them, for the correct information. Mea culpa, and thank you, Lisa.)
Now that I've got that off my chest, here's the tutorial. The only abbreviation used here is "dc" for double crochet. Otherwise this tutorial is written in plain English.
The First Shell:
Chain 5. Double crochet in first chain:
 |
| (1) |
Chain 3 (counts as first double crochet), TURN, then make 13 more double crochets in ring:
 |
| (2) |
Chain 1 and TURN. *Single crochet in 1st dc. Chain 4. Single crochet again in same dc.* Repeat this process in 2nd dc.
Single crochet in 3rd dc. *Chain 4, then single crochet in next 2 dc.* Repeat until you get to 13th dc.
In 13th and 14th dc (which is really the chain-3 that started the shell), make loops as in 1st and 2nd dcs (single crochet, chain 4, single crochet again in same dc.)
You should now have a shell with 9 loops,like this:
 |
| (3) |
Congratulations! Shell 1 is now complete. On we go to:
The Second Shell
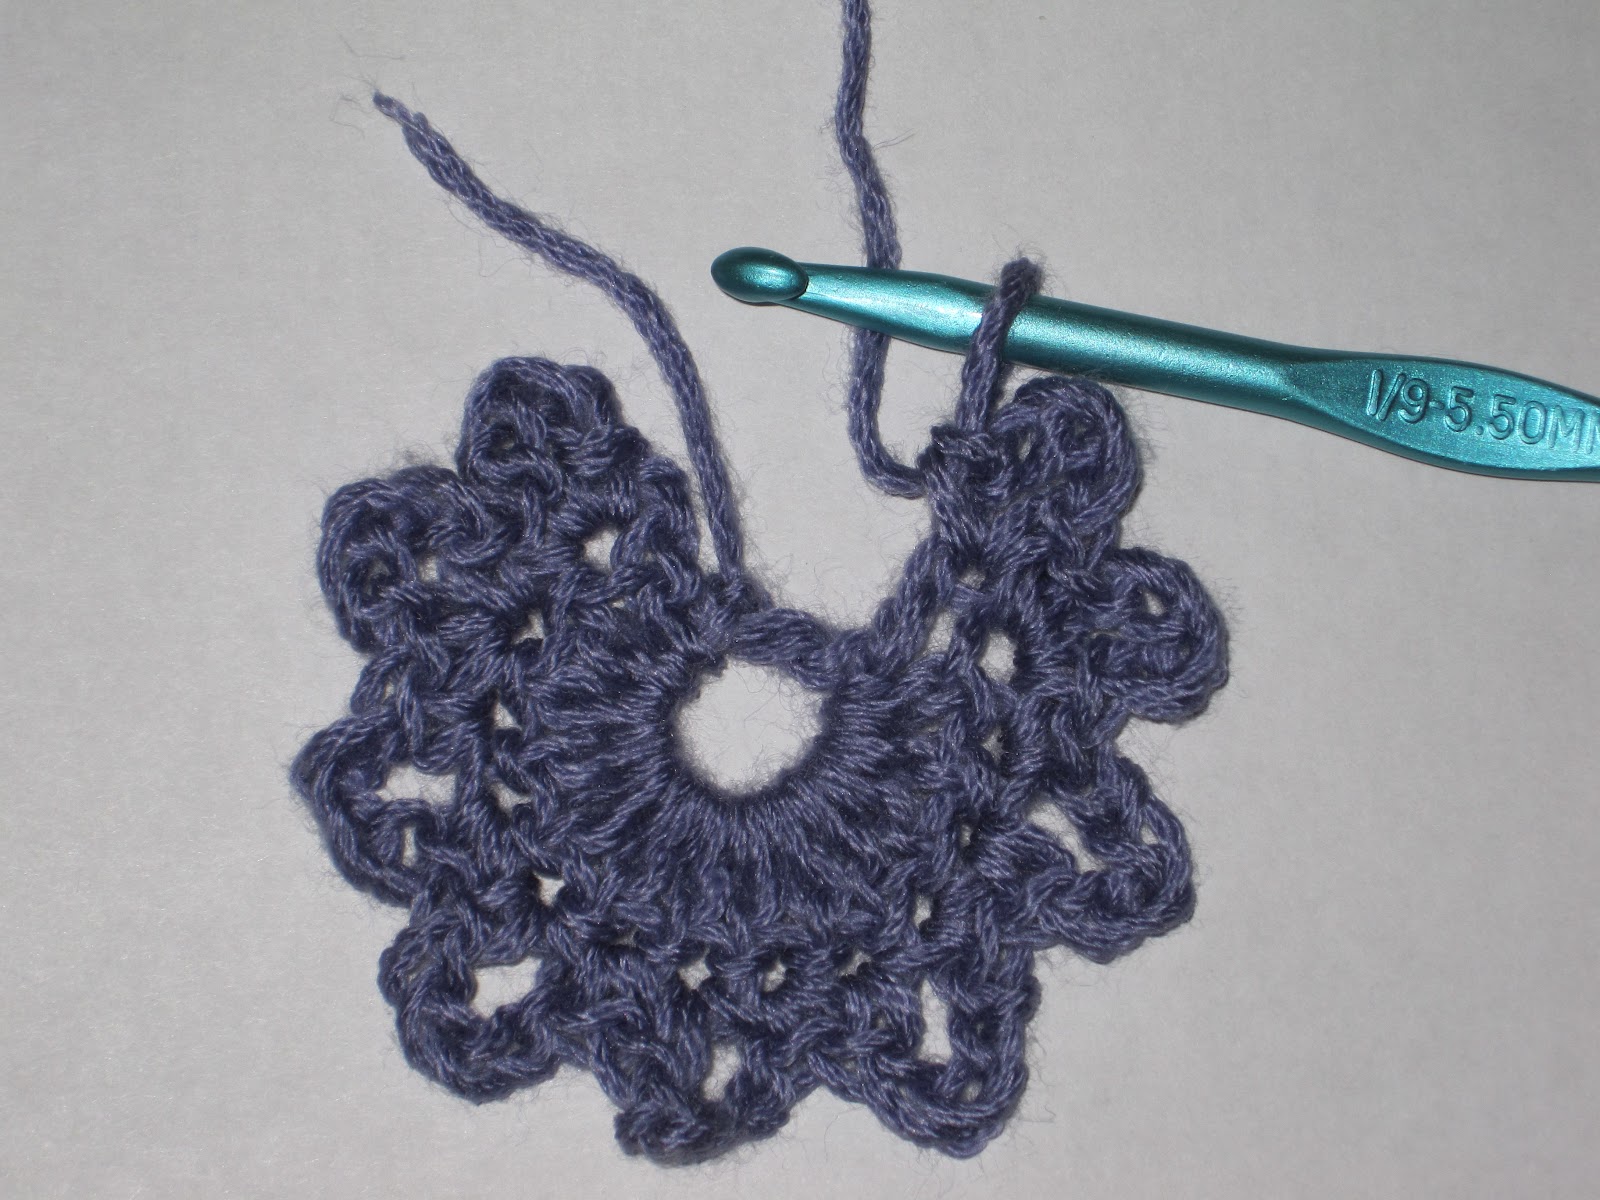
Chain 4, TURN, and attach with slip stitch to the last loop you just made. Now you have the "ring" for the next shell (it's that little loop sticking out to the right):
 |
| (4) |
Chain 3 (to equal first double crochet), and TURN. Now the "ring" is on the left:
 |
| (5) |
Make 13 double crochets in "ring":
 |
| (6) |
Insert hook in bottom chain of Shell 1's first chain-3:
 |
| (7) |
Yarn over and pull through (or in crochet lingo, slip stitch):
 |
| (8) |
Chain 2, then insert hook in base of other side of Shell 1. Yarn over and pull through:
 |
| (9) |
Chain 2 and TURN. Single crochet in first dc of shell just made:
 |
| (10) |
Chain 3. (Note to chart followers: the chart says chain 2 here. The chart is wrong. Sorry about that!) Remove hook from loop. With loop on left side of work, insert hook from front to back into the top of Shell 1 end dc:
 |
| (11) |
Put hook back through loop. Yarn over and draw yarn through both loops on hook:
 |
| (12) |
Chain 3 and single crochet in 1st dc of Shell 2...
 |
| (13) |
Right next to the single crochet you already made there:
 |
| (14) |
Now you're ready to add the loops and finish Shell 2. *Single crochet in next dc, chain 4, single crochet again in same dc.* Repeat in next dc. You should have 11 dcs left in your shell (one of them is the starting chain-3) at this point.
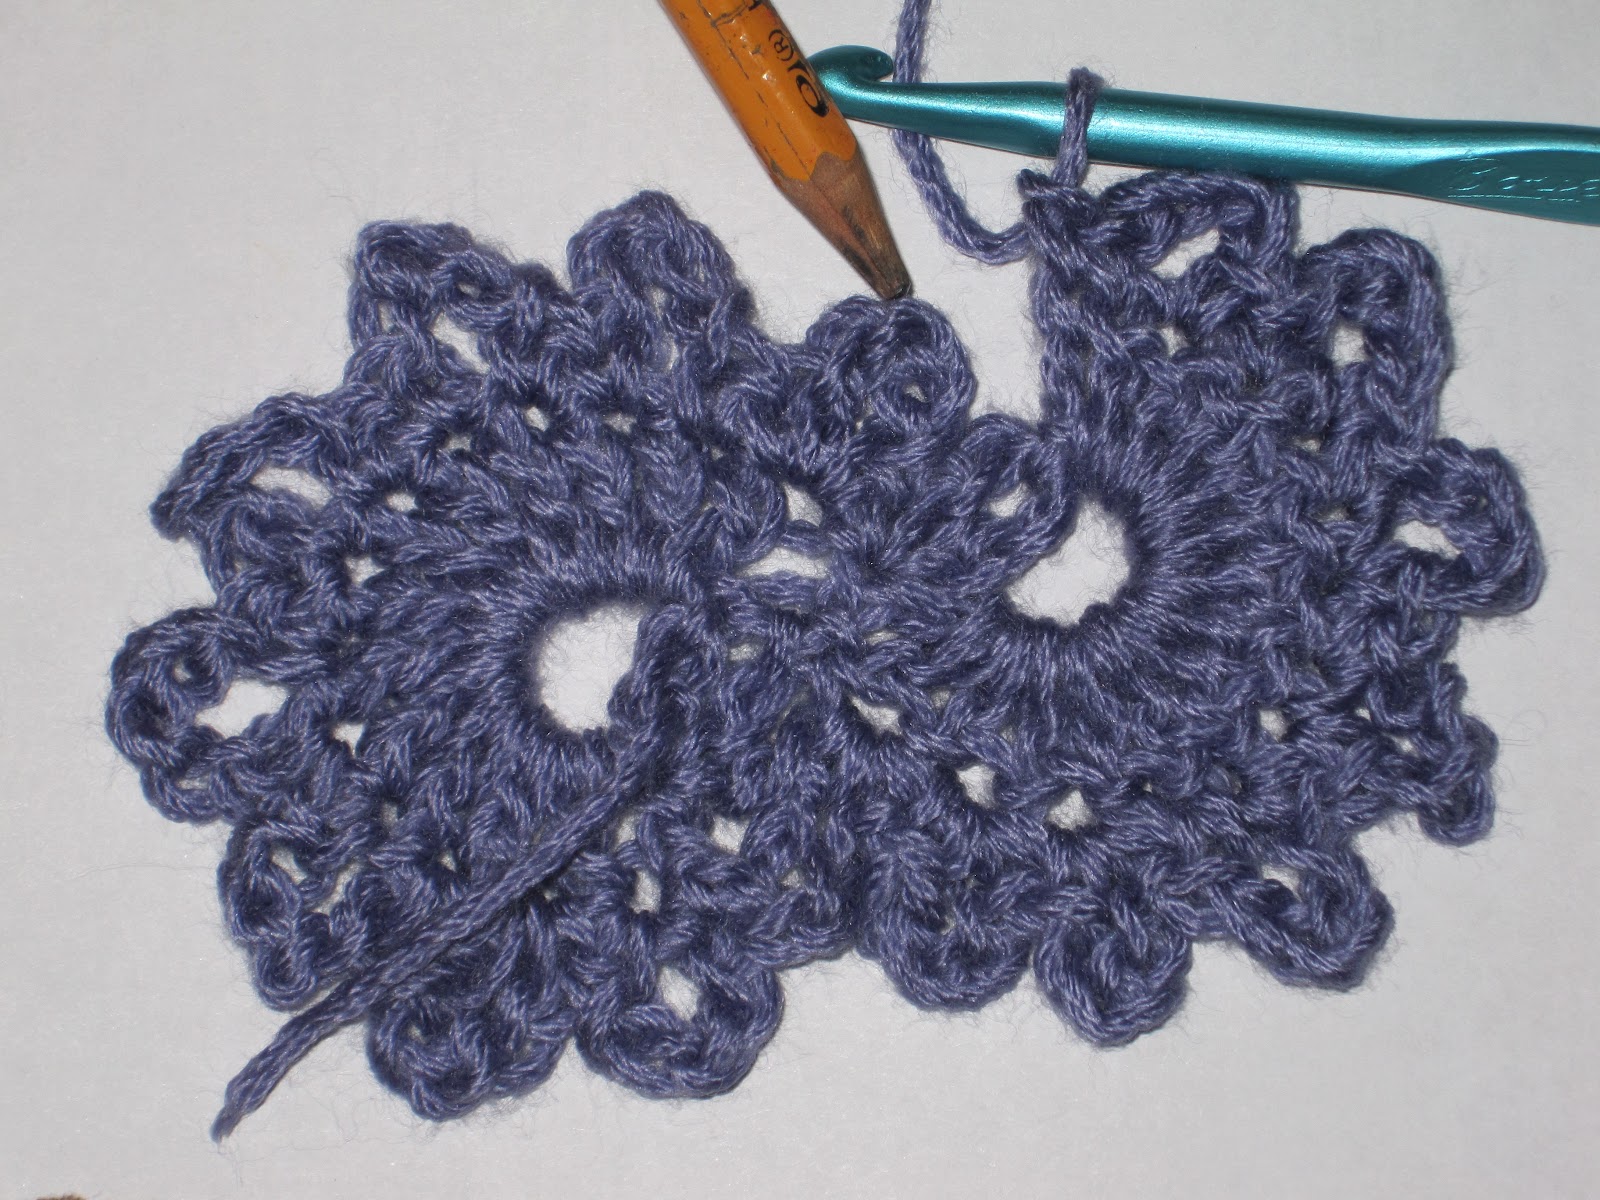
Single crochet in next dc. *Chain 4, single crochet in next 2 dcs*. Repeat to end of shell, ending with 2 single crochets. Now you have a shell with 7 loops. See where the pencil is pointing? Slip stitch in that loop (Note to chart followers: the slip stitch on the charted pattern points to the 3rd loop. The chart is wrong. Slip stitch in the 2nd loop, as pictured here):
 |
| (15) |
Congratulations! Shell 2 is done:
 |
| (16) |
The awkward part is over. From here on in, it's plain sailing...
Shells 3 and beyond:
Chain 4. See that loop the pencil is pointing to?
 |
| (17) |
TURN and slip stitch in that loop. Now you've made the "ring" for the next shell.
 |
| (18) |
Chain 3 (counts as first dc), TURN, then make 13 double crochets in the "ring" you just made. Slip stitch in that next open loop.
 |
| (19) |
Chain 1, TURN, and single crochet in next 2 dcs. *Chain 4, then single crochet in next 2 dcs.* Repeat until end of shell, always ending with 2 single crochets. Slip stitch in the next open loop of the PREVIOUS shell (again with the pencil!), and you've completed another shell.
 |
| (20) |
Now you're ready to chain 4, TURN, and slip stitch in the last loop you made - which is of course the first step of making the next shell. It's kind of addictive - I always want to make just one more shell before I put it down, and in next to no time, the scarf is 5 feet long.
Two reminders for this pattern: 1) TURN at the end of every pass, and 2) new shells are always attached to PREVIOUS shells at both ends.
Hope you find this helpful, and again, happy crocheting!
P.S. Here's another great key to crochet chart symbols.
~ ~ ~ ~ ~ ~ ~ ~ ~ ~ ~ ~
I wish I had seen this before I made my scarf. The two different ends drove me bonkers - I tried to fiddle with it a little but nothing half as satisfying as this. I'll have to make another this way
ReplyDeleteThank you SO much for this tutorial with PHOTOS!! I am a brand new crocheter who taught herself via You Tube videos. As a result, I tend to struggle with written patterns and this one was a doozy! On my next one, I will use your pattern. Thanks again! New follower, btw!
ReplyDeleteThanks so much, Pugspearlsandpurls and Cheri, for responding. I'm a new blogger and it's encouraging to get comments. Cheri, you're very welcome. I've been crocheting for years and I struggled with this pattern too.
ReplyDeleteMrs. Micawber,
ReplyDeleteI love your Dickensian themed blog. Wonderful.
And this tutorial is sublime.
Well done.
Most kind of you, Lolly. Thank you.
ReplyDeleteYou had me at the Mr. Macawber quote, but this tutorial is genius! And a chart to boot! One little note, since I had to go through the photo tutorial using the chart, bit by bit: Picture 11 says ch 3 but the chart shows ch 2, which I think the picture shows as well. Meh, kinda nitpicky, but you have my devotion so I hope you will forgive me!
ReplyDeleteYou are so right, Lisa. I got out my sample and it IS chain 3, although I mistakenly wrote chain 2 on the chart. (I see in my sample that I chained very tightly just there so a chain 2 would probably work as well.) If I can figure out how to correct the chart (it's just a photo of the paper I drew the chart on, which paper is now folded up and wrinkly and won't re-photograph well) I will fix the chart. Otherwise I'll just put a note in the written tutorial and hope everyone finds it.
ReplyDeleteThank you so much for catching this. I'm a stickler for accuracy and I'd much rather know if there's a mistake somewhere! And I'm so glad you liked the tutorial.
I like the ends better when they match, too, so this is brilliant. But now I have to rework the pattern I'm writing for my own design...
ReplyDeleteAlas, it will be more gorgeous now than it was when I started, right?!? :)
The funny thing is I made the scarf first (actually 3 of them), THEN had the idea to reverse engineer the beginning. So my scarf ends don't match. But the next ones will.
ReplyDeleteWhat are you designing now?
Thank you so much for this excellent tutorial!!!
ReplyDeleteYou're very welcome, Anne. Thanks for commenting! It makes my day.
ReplyDeletehi, i love your scarf! i'm trying out crochet for the first time and am attempting this pattern but have gotten stuck at only the first step. how do you make 13 double crochet in the 5 chain ring? sorry i'm asking such a beginner question, but would you tell me how to do that?
ReplyDeleteDear Anonymous,
ReplyDeleteNo need to apologize for asking questions. How can we learn if we don't ask?
The quick answer to your question is: You make the 13 double crochets by stitching in the "hole" of the ring. They aren't attached to the individual chains. Here's a link that shows the hook going through the hole of a ring: http://www.dummies.com/how-to/content/crocheting-in-circles.html. Look at the picture of single crochets in the ring. See how the hook goes through the hole? That's what you'll be doing.
So you chain 5, slip stitch to form a ring, then chain 3. (The chain 3 is like an imitation double crochet. It gets your hook and yarn into the right position for the next "real" double crochet.)
Yarn over, and dip your hook through the hole in the ring, so it points out the back of the ring. Yarn over again, and pull that yarn through the ring. Now your hook is in front of the ring. It should have 3 loops of yarn.
Yarn over, and pull through 2 of those loops. Now you have 2 loops. Yarn over and pull through both of them. Your double crochet is done!
If I were you, I would practice some chains, single crochets, and double crochets until your wrists and hands get used to handling the yarn. (You've probably done this already.) It will make your project easier.
Here are some more helpful links with pictures . I searched in Google and these came up first. Don't be put off by the site name. :)
How to hold the yarn: http://www.dummies.com/how-to/content/how-to-start-the-yarn-on-a-crochet-hook.html
How to make a slip stitch: http://www.dummies.com/how-to/content/how-to-crochet-the-slip-stitch.html
How to yarn over: http://www.dummies.com/how-to/content/how-to-crochet-the-slip-stitch.html
There are also lots of great videos out there that demonstrate stitches. Try this site:
http://crochet-mania.blogspot.com/p/index-of-patterns.html
Good luck and thanks for visiting!
P.S. to Anonymous:
ReplyDeleteYou might find it easier to crochet the original pattern of this scarf (my version is modified and extra fiddly). Lolly over at This Domestic Life has a beautiful tutorial for the original pattern, with much better pictures than mine. Check it out:
http://thisdomesticlife.blogspot.com/2011/02/crochet-101-class-queen-annes-lace.html
And I'm sorry these links aren't "clickable". I need a lesson in attaching links to a comment. Maybe there's an Internet for Dummies site I can use. :) I guess you'll have to cut and paste the link names.
Dear Mrs Micawber,
ReplyDeleteThank so much for your help! the crochet for dummies link is really helpful, especially. i'm really enjoying making this scarf; crochet is fun! and i'm still following your tutorial. i like how clear your pictures and steps are. thanks again!
You're very welcome. I'm so glad you're enjoying it.
ReplyDeleteThank you so much for your great tutorial! I have finished my first scarf yesterday and had a lot of fun making it.
ReplyDeleteMany greetings to you! Barbina
You're welcome Barbina. I'm glad it was fun. Keep crocheting!
ReplyDeleteWondering which Rav pattern to link to? I'm following this tutorial - fiddly or not here I go! I want the ends to match.
ReplyDeleteNewbie crocheter for anything beyond amigurumi (spirals!). Have just set it down at picture 10 - going back to picture 6 to try again. Another deep breath and just discovered you can click pictures to biggen!!
Laurie - I think this is the one most of us use:
ReplyDeletehttp://www.ravelry.com/patterns/library/queen-annes-lace-scarf
Yes, by all means enlarge the pictures! You are at the most fiddly part of all - the part that I reverse engineered to make the beginning look like the end. (That sounds ominous, doesn't it?) Sorry the pictures don't all have the best lighting. This is the first pattern I posted and I am still learning how to manage lighting.
You're at least the third new crocheter who has commmented - you're all very brave! I struggled with this pattern and I've been crocheting for something like 40 years!
Hang in there. Once the first 2 shells are done, the rest are all pretty straightforward.
There is at least one other tutorial out there for the original pattern (look a few comments back for the link). Also someone just posted a Ravelry download which I haven't seen but apparently it has pictures too. Here's that link: http://www.ravelry.com/patterns/library/queen-annes-lace-scarf-2
Good luck!
Thanks so much for this! I've looked at the original (and even have it printed), but I never made it because the ends didn't match! Can't wait to try this one!
ReplyDeleteYou're very welcome. I made three before I thought of doing this!
ReplyDeleteI cannot describe how happy I am with the pattern! Thank you (a ton!)for sharing it with us Sue. I crocheted a small part and refashioned a tee (link here)and I also linked to this fabulous tute!
ReplyDeleteA scarf is also under way :)
I'm so glad. What beautiful blogs you have!
ReplyDeleteThank you for this tutorial. I taught myself how to crochet using it...what a great first project. Finished the first two shells without a problem, then discovered that I did the double crochet a little differently in each of the shells. Started over and forgot everything! Actually, I think I was just using the wrong "ring" to do the 13 dc's in. Finally worked that out and now have eight shells and going strong.
ReplyDeleteWow, Teri! You're at least the third person I know who did this as a first crochet project. (I started out with things like rectangles when I learned to crochet.) Congratulations on successfully negotiating a tricky pattern while learning to crochet at the same time!
ReplyDeleteGreat tutorial! New crocheter here too..saw a belt on Etsy with this pattern, searched it out to figure what kind of stitch it was so I could make my own and found a couple blogs with instructions. However, this was the one that finally made it clear for me. Thanks to your easy to follow instructions (and quick follow-up to questions; I too was confused about the 13 double crochets in the 5 chain ring, lol) I saved $25 and have my belt!!
ReplyDeleteSo glad to hear it, LALola! I never thought of making this into a belt but it sounds very pretty.
ReplyDeleteI finally finished!! (not a lover of scarf making so there was a bit of foot dragging from time to time). Found out care must be taken while crocheting furiously in the Emergency waiting room. 3 hours later and every bit I did needed to be ripped out because of the unfortunate L-shape it took when I first sat down. Never noticed. grrr! Ripped it off fast like an ouchy band-aid :)
ReplyDeleteCongrats! The emergency room sounds ominous. I hope whoever you were waiting for had a good outcome. It's funny how the QAL scarf can take a 90-degree turn if you forget to turn at the end of a motif - I've done it myself. I've often thought that could somehow be the start of a great shawl.
ReplyDeleteAbsolutely stunning!
ReplyDeleteThanks so much for this tutorial! You make everything so very easy to understand, I love it!
ReplyDeleteYou're welcome, Michelle!
ReplyDeletemade this yesterday! i could not stop working on it, it came out great!
ReplyDeleteThanks Becky! So glad it worked out well for you.
ReplyDeleteI just saw someone's lovely new scarf crocheted from handspun, and as she used your tutorial, links directed me here. I always think of myself as "a reluctant crocheter" -- mostly because *I* glaze over at paragraphs of text instructions. :) Thanks *so* much for doing this tutorial -- I am a hundred times more likely to attempt this scarf now!
ReplyDeleteThank you so much for this! I am a seasoned crocheter and still always have difficulty reading patterns. I tried a written pattern of this 3 times and all of them were a mess.
ReplyDeleteSo thank you so much for your concise directions and awesome (enlargable!) pictures. You have no idea how much you saved my sanity!
Mrs. Micawber,
ReplyDeleteThank you so much for this wonderful tutorial! I'm still pretty new to crochet (I just started in July but boy do I love it!!) and I found your directions to be pretty clear and the photos are a big help. I'm making mine with King Cole Riot (Ace) which looks so lovely. So far I'm 18 shells in and I have to say that you are SO right that it's addictive. Thank you again :)
You're very welcome, briaboo! So glad you're enjoying your crochet experience.
ReplyDeleteHi again! Here is my finished scarf:
ReplyDeletehttp://titchystitches.blogspot.com/
(Actually, I've made two but one is for a Christmas gift so I'm not going to share photos of in online yet)
Thank you again for the great tutorial!
Thanks so much for this! I just found this last night, and am already started on my second one. I just learned to crochet, so patterns are kind of difficult for me to follow, but this was AMAZING. I pinned it on Pinterest, too!
ReplyDeleteYou're very welcome, Katy. I'm a visual learner myself which is why I started doing these tutorials. Thanks for "pinning". :)
ReplyDeleteThank you for your wonderful Queen Anne's Lace tutorial...complete with detailed instructions AND great pictures! I also *love* how you made the beginning and the end match up :) Thanks for sharing your process with us!
ReplyDeleteYou're very welcome, Blue Ridge Girl! (Love your avatar.)
ReplyDeleteAnother thankful beginner here..It is my second crochet project the first being the Iris shawl I found on Ravelry..I loved this but tried & unpicked about 6 times before I googled picture tutorial and yours appeared..it all makes sense now!!..Have to keep on remembering your double is our treble though! :~))
ReplyDeleteWhat size hook did you use? The one in the picture looks like a USH8/5MM but everywhere else I see to use a J hook.
ReplyDeleteThat was a size I / 5.5mm hook, which is actually a bit larger than recommended for the yarn I was using (NaturallyCaron Spa). You can use any yarn for this pattern, and any hook size that is appropriate for your yarn. The scarf will hold its shape better if the stitches aren't too loose and loopy. Thanks for asking!
ReplyDeleteHi. I am so glad you posted this tutorial. I am a learner and I have so wanted to make a similar scarf which I saw on pinterest. And I did see a lot of charts, but I can't read them :(
ReplyDeleteI am a new blogger too. You can find me here -
itssewlove.blogspot.com
I actually linked to this page in one of my posts. And you gained a new follower :)
Thanks so much, Mrunmayee. Good luck with your scarf.
ReplyDeleteYou are my hero! I'm starting one today!
ReplyDeleteomg just amazing just starting this right now .. one day before christmas for my mom!this is so easy to follow thank you very much! if i can do it anyone can .. im 16 lol =P thanks for the tut!
ReplyDeleteThank you! I can't wait to try this! I am a new crocheter and I wanted to make myself a special scarf!!
ReplyDeleteYou're welcome, Teresa. Good luck and be sure to post a picture on Ravelry if you can.
ReplyDeleteThank you so much for this!!! My neice pinned a picture of a scarf like this on Pinterest as something she loved. As a surprise, I thought I'd make one like it for her and thank goodness I found this tutorial! It has been so easy to follow and so far so good.......I hope she likes it as much as I do.
ReplyDeleteThanks again!
You're welcome, Kathy. I'm sure she'll like it very much.
ReplyDeleteHave you ever attempted to make these into a baby blanket? I saw a version on Ravelry but they used a pattern that is now out-of-print. I've made the scarf before but I'm not sure how to attach them as I go?
ReplyDeleteI haven't - although I did once succeed in making a double one (2 strips wide) as a gift for a friend. That was pre-blog and I didn't take any notes. It involved connecting the piots and was a bit cumbersome. If I ever get around to doing it again you may be sure it will show up as a post!
Delete"picots" I mean. :)
Deletethank you so much for the pictures and the explanations. i couldn't count how many times i frogged the before i found you site. now i feee comfortable in making more for gifts. thank you again :)
ReplyDeleteYou're very welcome. Thanks for commenting!
DeleteThanks for this tutorial! I have tried a few others, and couldn't get it to come out right!! I can now do it!! So grateful! The pics with the pencil were the most helpful!!! Denise
ReplyDeleteSo glad it worked for you, Denise. Be sure to post a pic on Ravelry when you're done!
DeleteThank you so much your pattern help me be successful!!!!
ReplyDeleteThanks for the pencil it really helped!
Sheila
Hello,
ReplyDeleteThank you so much for these instructions. I have self-taught myself to crochet (using a book), and this is my 3rd crochet project. I too saw the other pattern (the one with the ends that don't match), and it drove me crazy two different end (massive OCD). I have followed your instructions pretty much, with exception that I do 6 chains instead of 4 to make the ring. Thank you again!!!!!
I'm so glad you found them helpful. Congratulations on learning to crochet!
DeleteThank you so much for this tutorial. I am a self taught and sometimes I have troubles with patterns. This was by far the easiest! The step by step instructions with pictures were so helpful. Thank you so much :)
ReplyDeleteThank you! Thank you!! Thank you!!! for taking the time to make this tutorial! I found this pattern and your link on Ravelry, grabbed a ball of yarn, and went through your tutorial...step by step....And, guess what?! It is looking beautiful! Your directions are so clear that even this newbie could follow them. I am so excited with this new pattern that I think I will be up all night, making 'just one more shell'! :) Thanks again!
ReplyDeleteThis is a great tutorial! And a pretty nice looking scarf too.
ReplyDeleteThanks, bumpstr!
DeleteAnyone have any idea how to make this into a shawl?
ReplyDeleteA very big Thank You to all who have commented above. Your comments make my day!
ReplyDeleteTo Anonymous - I don't know of any shawl patterns based on this scarf. I did once, a few years ago, work out a way to make a double QAL scarf - but didn't write it down. If I can remember how I did it, I'll try to post it as a pattern in the future.
You could try making separate scarves, then linking them together with a sort of chained seam, zig-zagging back and forth between the picots. Just an idea. :)
Ditto to all the rave reviews--great pictures and explanation. I especially like when you point to the crucial stitch. But one spot I found a bit confusing. The very last sentence says to chain 4, turn, and sl. st. in the last loop. Then to continue with a new shell, I go back up to where it says "Shells 3 and beyond". This section starts with the same directions, "Chain 4, turn," etc. When I did it this way, with two ch. 4-turn's, I was going the wrong direction and it looked goofy. So I just did it once, and it came out fine.
ReplyDeleteI can't believe that in all of these bizillion comments that no one else had a problem with this, so maybe I'm doing something wrong. Very confused, but I love the pattern!!
Thanks Jeannette - I do see what you mean. There's an overlap there - I guess a better way to put it would have been "Now you're ready to chain 4, TURN, and slip stitch in the last loop you made - which is, of course, the first step in making the next shell." :)
DeleteBut the important thing is you figured it out. I'm so glad you found the tutorial helpful. Thanks for commenting, and I will try to clarify that text.
I just got a link to your site from someone in The Crochet Crowd. I love this kind of picture tutorials; and, I will probably NOW be able to make this scarf. Thanks ahead of time.
ReplyDeleteYou're very welcome, and thanks for commenting. :)
DeleteHi ,it is almost one a.m.and my eyes are buggy.. could you be so kind as to give me the instructions as they should be after step 9, I am very confused by the corrections!
ReplyDeleteI as well have almost finished this scarf with the wonky end! Darn. I am addicted to crochet and a perfectionist at heart. Thank you, I need to get to bed, night night!!
Hi Anne - sorry it took me so long to answer your question. That correction is really of no use to the pattern so you might as well ignore it.
DeletePart of the confusion may be due to the fact that in Photo 10, the work has been turned over.
In Photos 7 & 8, you connected the beginning of Shell 2 (which is just a bunch of dcs at this point) to the base of Shell 1 (the one with picots).
Now it's time for some chain stitches which will zigzag back and forth between the two shells to mimic the look of the rest of the scarf. You're be making 2 sets of zigzags.
Photo 9 shows you the first step of this zig-zagging process. Your hook is in the little crook between Shells 1 & 2. Then you chain 2 and attach the yarn to the other side of Shell 1. (In Photo 9 I have made the chain-2 and am about to slip stitch to Shell 1.)
Now your hook is attached to Shell 1, a few stitches away from Shell 2. You want to get your hook back over to Shell 2.
So you chain 2 again, TURN your work, and re-attach to Shell 2 by making a single crochet in the top of the nearest dc. (Photo 10 shows this completed step).
You've completed one zigzag between the shells; now you need to zigzag AGAIN.
Your hook is attached to Shell 2 right now. Chain 3, and take your hook out of the working loop of yarn, leaving the chain-3 hanging loose. (You're about to attach that chain-3 to Shell 1 with a fancy kind of slip stitch.) Stick your hook through the top of the double crochet at the end of Shell 1. Now pick up the loop of yarn that is hanging loose (you may need to gently tug on the yarn to tighten up the working loop around your hook). In Photo 12 the working loop has just been put back onto the hook.
Yarn over, and pull through all the loops on your hook. Now your hook is back over at Shell 1. Only one more step to go in this zigzag - you need to get that hook back over to Shell 2.
Chain 3, and single crochet in the first dc of Shell 2. (You already made 1 sc there a few steps back. This sc will crowd in next to the previous one.)
Your zigzagging is finally done - now you can start making picots for Shell 2.
I hope this clears up that awkward bit for you. If you still have questions, don't be shy. Ask away, and I'll be glad to explain further if you need me to.
Good luck (from one perfectionist to another)! :)
Hi! Working on this right now, and it's coming out exactly as you said. I had a question about a very similar pattern I found but can't understand how to start it. Would you be able to help me figure it out? I've attached the link below:
ReplyDeletehttp://make-handmade.com/2011/08/26/gift-presents-women-crocheted-scarf-eastern-fan-patterns/
Thanks!
Can you read the chart? Let me know and we'll go from there.
DeleteI can read how to make the individual fans, but I'm not really sure how each fan is attached to the next one. And do you read from right to left or left to right? Sorry for all the questions, thanks so much for your help!
DeleteOkay, let's see if we can figure this out. The pattern is very similar to Queen Anne's Lace.
DeleteI think the fans are made one long strip at at time - like several QAL scarves. When your first strip is as long as you like, you start a new one, and join it to the previous strip during the picot rounds.
To make the first individual strip: When you finish the first motif, chain 5, then slip stitch in the base of Round 2's starting chain. Then chain 4, and slip stitch to the opposite top of Round 2's ending stitch. (This will act as the first stitch of Round 1.) Turn, and finish Round 1 in the chain-5 space. Turn, and make Round 2. At the end of Round 2, slip stitch to the second picot of Fan #1, then turn and begin Round 3 of Fan #2.
After Fan #2, it looks like the other fans in the strip are joined to the third picot of the fan below. (The chart is inconsistent on this.)
How to join strips (working from right to left):
Let's say you have one entire strip done. You have started the next one. When you reach Round 3 of the first fan (on the second strip), you join the 14th, 15th, and 16th picots to the 1st, 2nd, and 3rd picots of Fan #2 from the first strip.
How you join the picots is up to you - you can chain 1, slip stitch to the opposite picot, then chain 1 again. Or you can join them with a single crochet.
Fan #2 on the second strip will not be joined to anything. (When you get to the third strip, you will join to this fan.) If you're working from right to left, then only the right-side fans will be joined to the previous strip as you go.
The rest of the joins can be seen on the chart. This is a pattern that requires careful attention, I think. :)
Re: working from left to right: I don't think it matters too much since you're making one long strip at a time. You could go either direction.
Does this help any? Please ask again if I wasn't clear enough. I can figure out the pattern from the picture, but explaining it clearly is more difficult. :)
Thank you so much for your easy to use instructions. They make the project so much easier with the pictures. I have had a hard time with the original written instructions on Ravelry. Hope this will make it easier.
ReplyDeleteThank you, and good luck with the pattern! I had a hard time with the original instructions too - just couldn't visualize the necessary turns. Hence the tute. :)
DeleteWow! Thank You so much for this awesome tutorial. You're so right, this is very addictive.
ReplyDeleteI am so thankful that I stumbled onto your site. I used google to find you.
The pic's are so very helpful.
Great Tutorial.
Dee
So glad you're finding it helpful. Thanks for commenting! :)
DeleteVery thankful that Ravelry has the "helpful projects" search in the project gallery for a pattern. I tend to check it out when starting a new project, and found your blog that way. You've helped quite a few crocheters out with this pattern! My scarf looks lovely, and I am so pleased with the matching ends. Now I just need to block it, and wrap it up for Christmas! (It's so pretty though, I wish I could keep it!)
ReplyDeleteThank you, Susan - I'm so glad it worked out for you. You'll have to make one for yourself next time. :)
DeleteI'm abit late here, but-
ReplyDeleteIs this quick to do? I'm a really really slow crocheter and I get really easily distracted and it needs to be done after school before christmas.
And what size hook did you use? :) thanks, it looks a good pattern cause there's so many pictures!
Well, it's quick for me - you'll have to give it a try for yourself.
DeleteI think I used a size H or I hook with NaturallyCaron Spa yarn (from the pictures it looks like an I). Look at your yarn label - there should be a little symbol with a crochet hook and a size. This is the recommended hook size for your yarn - I'd start with that.
Once you get through the first two shells, the rest of the scarf does go pretty quickly, I think. Good luck!
If you want an even faster pattern (or two), check these out:
1. http://mrsmicawber.blogspot.com/2011/03/bean-blossom-scarf.html (This makes a very skinny, but fun and funky scarf - super fast too.)
2. http://mrsmicawber.blogspot.com/2011/04/flowering-clematis-scarf-pattern-and.html (A very pretty, lacy scarf, less complicated than Queen Anne's and a little faster to make.)
P.S. Both these patterns have phototutorials too. :)
Deletehi
DeleteThank you for this tutorial. I love this pattern, but am not very good as reading patterns ( was only taught the basics). I am looking forward to trying to make this pattern, with the help of your tutorial.
ReplyDeleteThank you again.
Thanks, and good luck. Please feel free to ask for help if you have any questions. :)
DeleteMany years ago I made an afghan with strips of this pattern, and regrettably lost the instructions. Now that I have found the pattern for the strips, I hope I can figure out how they were joined. It really makes aq lovely afghan!!
ReplyDeleteI'm so glad this came in handy for you.
DeleteI believe this pattern may have originally come from a book called "Crochet in Plain English" - perhaps you could find a used copy somewhere online.
Good luck with the afghan! :)
no it did not
Deletehttps://www.ravelry.com/patterns/library/queen-annes-lace-4
DeleteFrom Crocheting in Plain English, by Maggie Righetti, published 1988. Includes a blanket option. :)
Happy happy joy joy! I've made this scarf once, for my mom, and I tried to do this modification myself, but I really didn't come up with anything. I'm making myself one, now, and I'm really pleased to find a pattern that worked out the mismatched ends! Thank you!
ReplyDeleteYou're welcome - so glad it will come in handy for you. :)
DeleteI've just started crocheting and I found this pattern. I'm starting on it and I'm on my 4th motif but it seems really unstable when I "chain 4, TURN, and slip stitch in the last loop you made" because the new motif only connects to the scarf on one spot. It looks a lot more stable when you make it? Am I suppose to follow the directions for making the third shell where you stitch into the last loop of the previous motif rather the loop on the one you just finished?
ReplyDeleteIt will connect in more spots as you go along - this is just the first connection. The "chain 4, TURN, and slip stitch in the last loop you made" are the first step of your next shell - the same steps which were illustrated in Photos 17-18. Now you're ready to do the chain-3 and all the double crochets that are in Photo 19.
DeleteTo continue, keep repeating all the steps from "Shells 3 and Beyond" (just above Photo 17) through "and you've completed another shell" (just above Photo 20).
Hope that makes sense, and thanks for commenting! Good luck with your scarf. :)
Yes! Thank you so much! I misunderstood it and skipped the "Slip stitch in that next open loop," but now it makes sense!
DeleteLove this pattern!! Thank you for the tutorial! I too get that glossy eyed look when reading patterns! Can't wait to make some of these for Christmas gifts!!
ReplyDeleteYou're welcome, and thanks so much for commenting. :)
DeleteMore than 25 years ago I had this lovely pattern and made a baby blanket with it for several babies....just joined the strips together untill I had the width I wanted.....the only thing is...I can't remember how I joined the 3rd strip after I had done the 2 strips and maybe some one can help me with this? I made the baby blanket quite wide and in baby wool...it was quite lovely!
ReplyDeleteGosh, you've got me. I once made a double QAL scarf but I will admit I had a hard time figuring out the joins and staggering the motifs properly.
DeleteAccording to Ravelry, the pattern originally came from a book called "Crocheting in Plain English", which also included instructions for a QAL blanket. The book is available (used) on Amazon, or you could see if your library system has it available. Good luck! :)
Thank you for the tutorial!
ReplyDeleteoh my word! thank you thank you for this tutorial! i'm fairly good at crochet, but i don't think there would be any way i could read a pattern for this!
ReplyDeleteWonderful pattern tutorial! Thank you so much. I just finished crocheting the pattern and am referring to your tutorial on my blog. Thanks again! Michelle
ReplyDeleteWhat an excellent pattern, i am enthralled! I've done a chunky yellow scarf and a silky lace green scarf with it so far, and i'm about to sit down with some white cotton thread to do a lace choker. You were right about this pattern being addictive! Thank you so much.
ReplyDeleteU have a very awesome way of explaining and the pattern is simply superb! Thanks :)
ReplyDeleteAfter crocheting for so long, I'm finally making a scarf using this pattern. Luckily I came across your post. Not only did you provide an alternative and beautiful option, your pictures and instructions are some of the best I've come across.
ReplyDeleteI am not very good for english write, so l love to say thanks you for the crochet pattern and the pictures
ReplyDeleteThank you so much for this pattern! I've been looking for it everywhere
ReplyDeleteI have seen this pattern and thought it would be lovely to make. Glad I waited for the "improved" instructions. BTW, I am one who is totally lost trying to figure out diagrams so I need "words".
ReplyDeleteAWESOME pattern!! You are so very sweet to share. Excellent directions too! Thanks much.
ReplyDeleteThank you so much for your comment - I hope she enjoys her scarf! :)
ReplyDeleteHi! I'm finally going to make this. Received some lavender yarn as a gift and will try my hand at it. I am so excited!! Thank you for the pattern!
ReplyDeleteOkay, this reply is ridiculously late. But thanks, Astri! I hope the scarf came out well. :)
DeleteHello, I just wanted to say I made this scarf over a year for a friend going through chemotherapy. I just started one for another friend who wants it in purple for fibromyalgia awareness. Thank you for posting the pattern with pictures...years later it is still much appreciated!
ReplyDeleteYou're very welcome!
DeleteThank you I have made this pattern several times but I always come for you to start me off. Lol
ReplyDeleteYou're welcome! :)
DeleteI love this pattern and want to make it as a gift. How many yards did you use to make a nice length scarf? I am afraid to start and not have enough yarn to make it long enough. Thank you so much for the pattern!
ReplyDeleteI can't remember how many yards I used, but I think 200 yards might be enough for a 60" scarf.
DeleteHave you checked the pattern's projects on Ravelry? Some Ravelers are very good about including how much yarn they used and giving the dimensions of their projects. You might be able to get an idea that way.
Good luck and thank you for commenting! :)
I quite agree with you, Mrs Micawber, that once you start using charts there is no way you want to go back to written instructions. I remember one lunchtime, as I sat at my desk crocheting after finishing my lunch, a man entered the office and saw my chart. “Good grief!” He said. “How on earth do you understand all that?” I gaped. He was a mechanical engineer, used to understanding things a lot more complicated than a crochet pattern.
ReplyDelete