Monday, February 29, 2016

February - a Mixed Bag

What a month this has been. Surgery for my dad, a death in the family, the sudden shadow of cancer swooping down to hover over another family member - all these have made for many stressful days.

But February wasn't all bad. Mr. M celebrated a birthday this month, which is a Good Thing (even at our age). Warm weather and an early thaw allowed me to take my first-ever Wisconsin February bike ride. Another first: having a magazine article published this month. For these things I am very grateful.

~

Speaking of February and bike rides.... The weather must have been delighted by our enthusiastic response to the warm spell of ten days ago, for it decided to offer a repeat performance the following weekend.

Another sunny Saturday in the 50s was an opportunity too good to pass up:

Sunny Saturday

The warm weekend temperatures lasted well into Sunday, though the sun had disappeared behind a heavy layer of cloud. By late Sunday afternoon the mercury was dropping again, but this didn't stop Tallulah and me from taking another ride.

Cloudy Sunday

A cold wind hissed over the still-frozen marshes, where red-twig dogwood hinted at a colourful spring to come:


Iris the bike leaning against a rusty bridge rail:


Tallulah thought she had found a petrified turtle, but it was only a bolt after all:


By the time we finished our ride, the temperature had dropped from 52 to 36 (F), with a shrieking northwest wind spitting a fine, frozen rain in our faces. And that was the end of February's second warm spell.

As I write this post on Monday night, snow is beginning to fall; the forecast is for 2 to 5 inches by morning. But winter's back is already broken: the ground is thawing; green grass is beginning to appear; the wild geese and sandhill cranes are returning by twos and threes. There are even rumours of robin sightings. It looks as though spring might be early this year.

~

Happy Leap Day to you! And may March be better than February.

~ ~ ~ ~ ~ ~ ~ ~ ~ ~ ~ ~

Sunday, February 21, 2016

Snow and Wind

February weather can fluctuate wildly, going from hard winter one week to mild and almost spring-like the next. Here are a few photos from both ends of the extreme....

~

Last Sunday was snowy and blowy and cold, with a driving east wind and multiple-personality precipitation that switched from large flakes in the morning to biting icy pellets in the afternoon to fluffy and perfectly-formed storybook snow after sunset.

My walk was taken during the stinging-pellet phase, when clouds and snow and air seemed merged into a single swirling mist of white, and trees were reduced to brown outlines of themselves. Not the best conditions for photography, but still I like walking in this type of weather, where distances are softened and only the immediate is clear.

Clumps of icy snow on asphalt:


The sun was suffering from an excess of shyness; it peeked through the cloud-veil once or twice, but never showed its full face:


Stripes on the branch of a very small tree:


A mini-landscape of wind-carved snow and dark branches against the wintry sky, with just a hint of the sun glowing behind the clouds:


I liked the look of the twigs growing up through this brush-pile...


...and the line of scraggly grass marking the boundary of this field:


(The sun was completely invisible by this time, hence the cold blue look of the photos.)

One last shot of wild grass shivering in the wind:


That was last weekend.

~

This weekend started out quite differently. On Thursday and Friday, high southerly winds pushed the mercury up and melted off much of our accumulated snow. Saturday dawned sunny and clear; by Saturday afternoon, temps had reached the mid-40s, and the wind had died back to a manageable 10-15 mph.

There's only one thing to do when the year plucks a day out of April and drops it into February:


Take your camera - and your turtle - for a RIDE!

(It was a bit of a shock for Tallulah, who has spent most of the winter asleep in her basket, stashed with the bike in a dark hallway. There were loud turtle yawns and much blinking of eyes as Mr. M pumped up my tires - but when we hit the road she woke right up.)


Only a short ride, with few photos, but an unexpected treat on a February weekend.

Before we finished, clouds had rolled in, and the kind western wind was veering to the north. Today the temps are back in the 30s, and a woolly grey veil is covering the sky. A good day for knitting and cups of hot tea.

How's your weather?

~ ~ ~ ~ ~ ~ ~ ~ ~ ~ ~ ~

Friday, February 12, 2016

Happy and Sad

Like many bloggers, I prefer to write about the happy moments of life - but life is a mixed-up thing. Sometimes it ambles along quietly and contentedly, following established routines and patterns; sometimes it goes a little crazy, jumbling events and emotions into untidy heaps of happy and sad, lovely and grotesque, piteous and merely pitiful.

This week has been one of the jumbled ones - and so will this post be.

Recently, one of my sisters-in-law, who'd been battling cancer for years, took a turn for the worse. A close family member took advantage of this situation to wreak financial and emotional havoc, using lies and manipulation to try to gain control of my sister-in-law's money. There are no words fit to describe this behaviour. (Well yes, there are: narcissism and compulsive lying. They describe it perfectly.)

The pain and heartache caused by this person's actions cannot be imagined. It's not the first time she's acted this way; it's just one event in a long pattern of lies and self-serving betrayal that has left a trail of strife and emotional wreckage across the lives of many. As a family, we spent years being deceived by this person. Being more or less honest ourselves, we assumed that she was too. When her stories began to wear thin, we tried to be kind. We brushed her behaviour under the carpet, hoped for the best, talked about waiting for her to "mature", and encouraged her with words and with misguided financial help - all to no avail. The canker of narcissism is soul-deep; I doubt whether anyone but God can remove it.

My sister-in-law died a few nights ago, sooner than expected. My poor brother is bereft. The narcissistic family member remains, casting an ugly shadow over our grief. We hope my brother can (and will) protect himself from her.

So where is the happy in all this sad? We've been drawn closer as a family, both by my sister-in-law's death and by the open acknowledgment of the narcissist in our midst. Old lies are being laid bare; old wounds are beginning to heal; there's a new spirit of solidarity and a determination to be honest with each other. Those are good things.


~

Here's another: the day after my sister-in-law's death, a magazine arrived in the mail, containing two of my patterns and my first published article.

Love of Crochet Spring 2016

The article is a short treatise on Center Single Crochet (also known as Split Single Crochet, Shallow Single Crochet, and Waistcoat Stitch). It's got plenty of tips, helpful photos, and a good dash of crochet geekery, including a new, right-leaning crochet decrease developed especially for this stitch.

To accompany the article, there's a pattern for some little pottery-inspired bowls, worked in Center Single Crochet and edged with slip stitch. Here's the original sample bowl, in worsted weight hand-dyed superwash wool:


And here are the magazine bowls, worked in a chunky, colour-changing yarn:


Center Single Crochet makes these bowls extra solid and sturdy. The pattern will work for any weight yarn, and can be easily adapted to make a wider bowl.

Also in this issue is the Peapod Shawl, a soft and lacy confection made from joined motifs that feature modified Lover's Knots worked in the round, with thoughtful placement of back-loop and back-bar stitches for visual texture.

The motifs remind me of bicycle wheels (in fact my working name for this design was Wheels of Love). You can see the original swatch below (in green), along with the magazine shawl at various stages of completion:


The pattern is join-as-you-go, but rather than work and join one motif at a time, I used a production-style assembly - working most of the motifs to just before the first join, then cutting the yarn (leaving a tail long enough to join and finish the motif later). This streamlined the assembly, and minimised handling and friction.

Here's the finished shawl as pictured in the magazine:

Photos courtesy of Love of Crochet

The Peapod Shawl was worked in Paton's Lace Sequin, a mohair blend that gives good stitch definition and creates a cloudy-soft fabric.

Love of Crochet Spring 2016 has lots of beautiful and interesting patterns - check it out!

~

Another happening this week: more surgery for my dad. This is also a mixture of the good and not-so-good; we're so thankful for excellent medical care, though we'd much prefer he didn't need it. But all that sitting and waiting does give knitting time to the daughter/chauffeur du jour.

Dad came out of it well, and we hope this will be his last surgery for a long, long time.

~

How was your week?


~ ~ ~ ~ ~ ~ ~ ~ ~ ~ ~ ~

Saturday, February 6, 2016

Raggedy Heart Coasters ~ a Free Fabric Crochet Pattern

Once I was a quilter, and I have a fabric stash to prove it. But now that yarn has taken over my life, the fabric stash lives in the laundry room - a scrambled rainbow of fat quarters and remnants that mutely reproach me every time I hang socks on the line or pull towels out of the dryer.
"Hey!" the fabric seems to say. "Remember us? You never play with us any more. Have you stopped loving us?"
Poor fabric! Though I've left you out there in the dark, with the acrylic paints and glitter and other detritus of a roving crafty fancy, I haven't forgotten you - and I love you still. Here's proof....


Fabric crochet coasters are pretty popular here at Micawber Towers. They're sturdy, washable, heat-resistant, quiet (Mr. M is a terrible cup-clanker), and handily soak up stray drips. We've been using them for years, and keep them stashed all over the house: on the dining table, on lamp tables, at the bedside, on my desk.

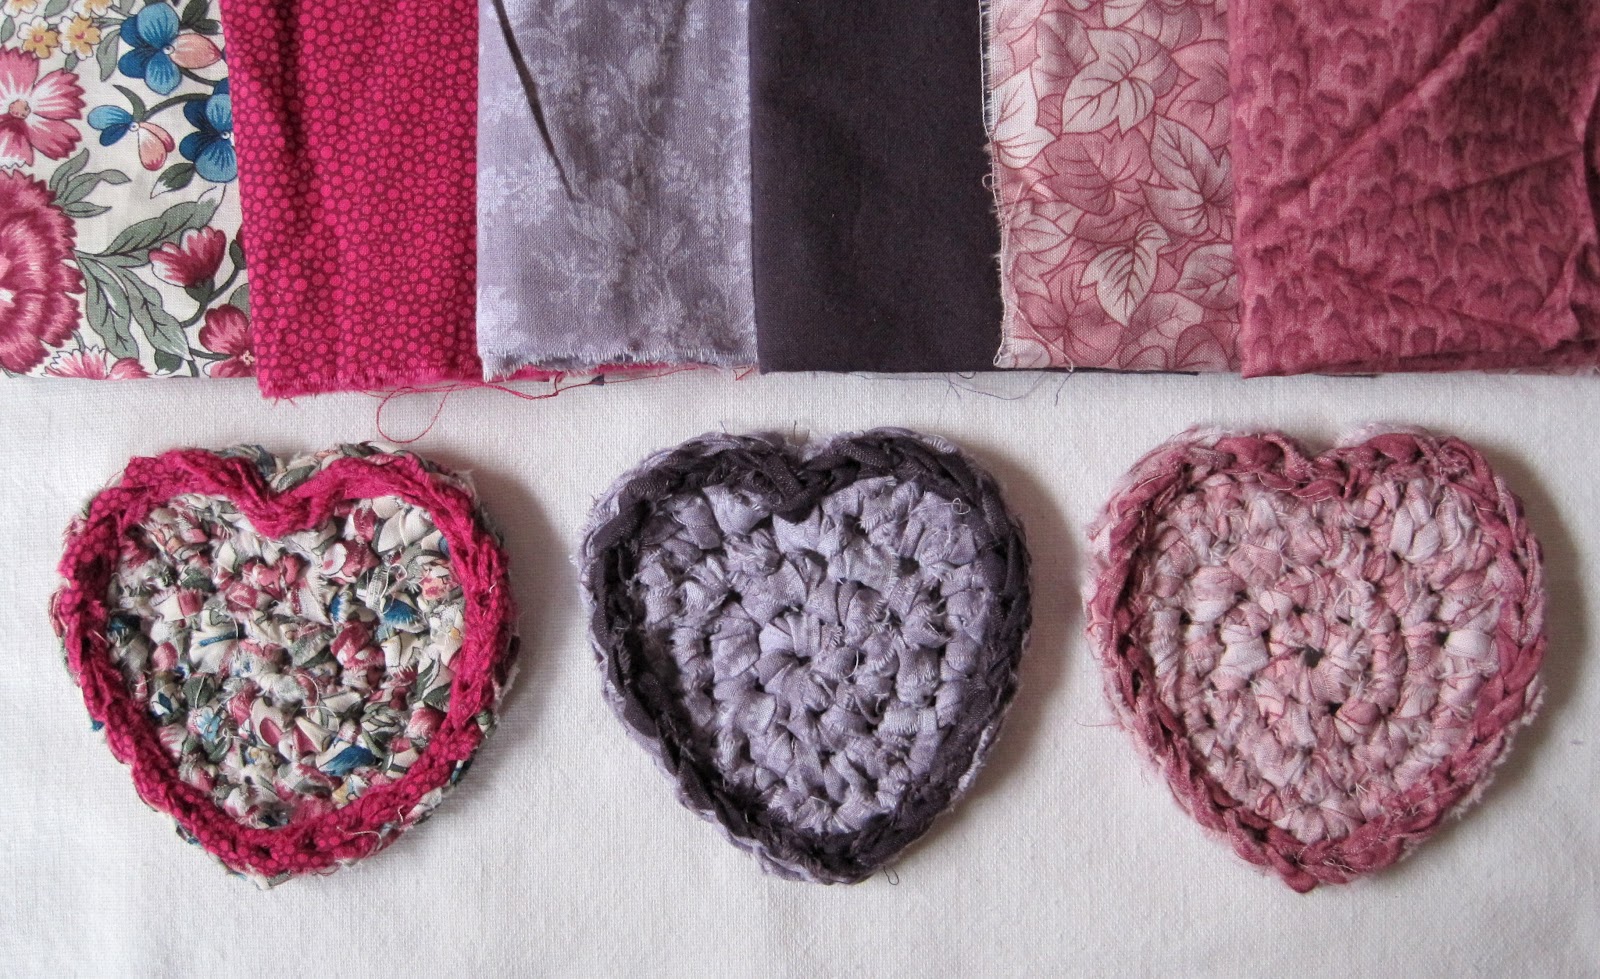
Though I've always made round coasters in the past, I thought it might be fun to try another shape - and so the Raggedy Heart Coasters were born.

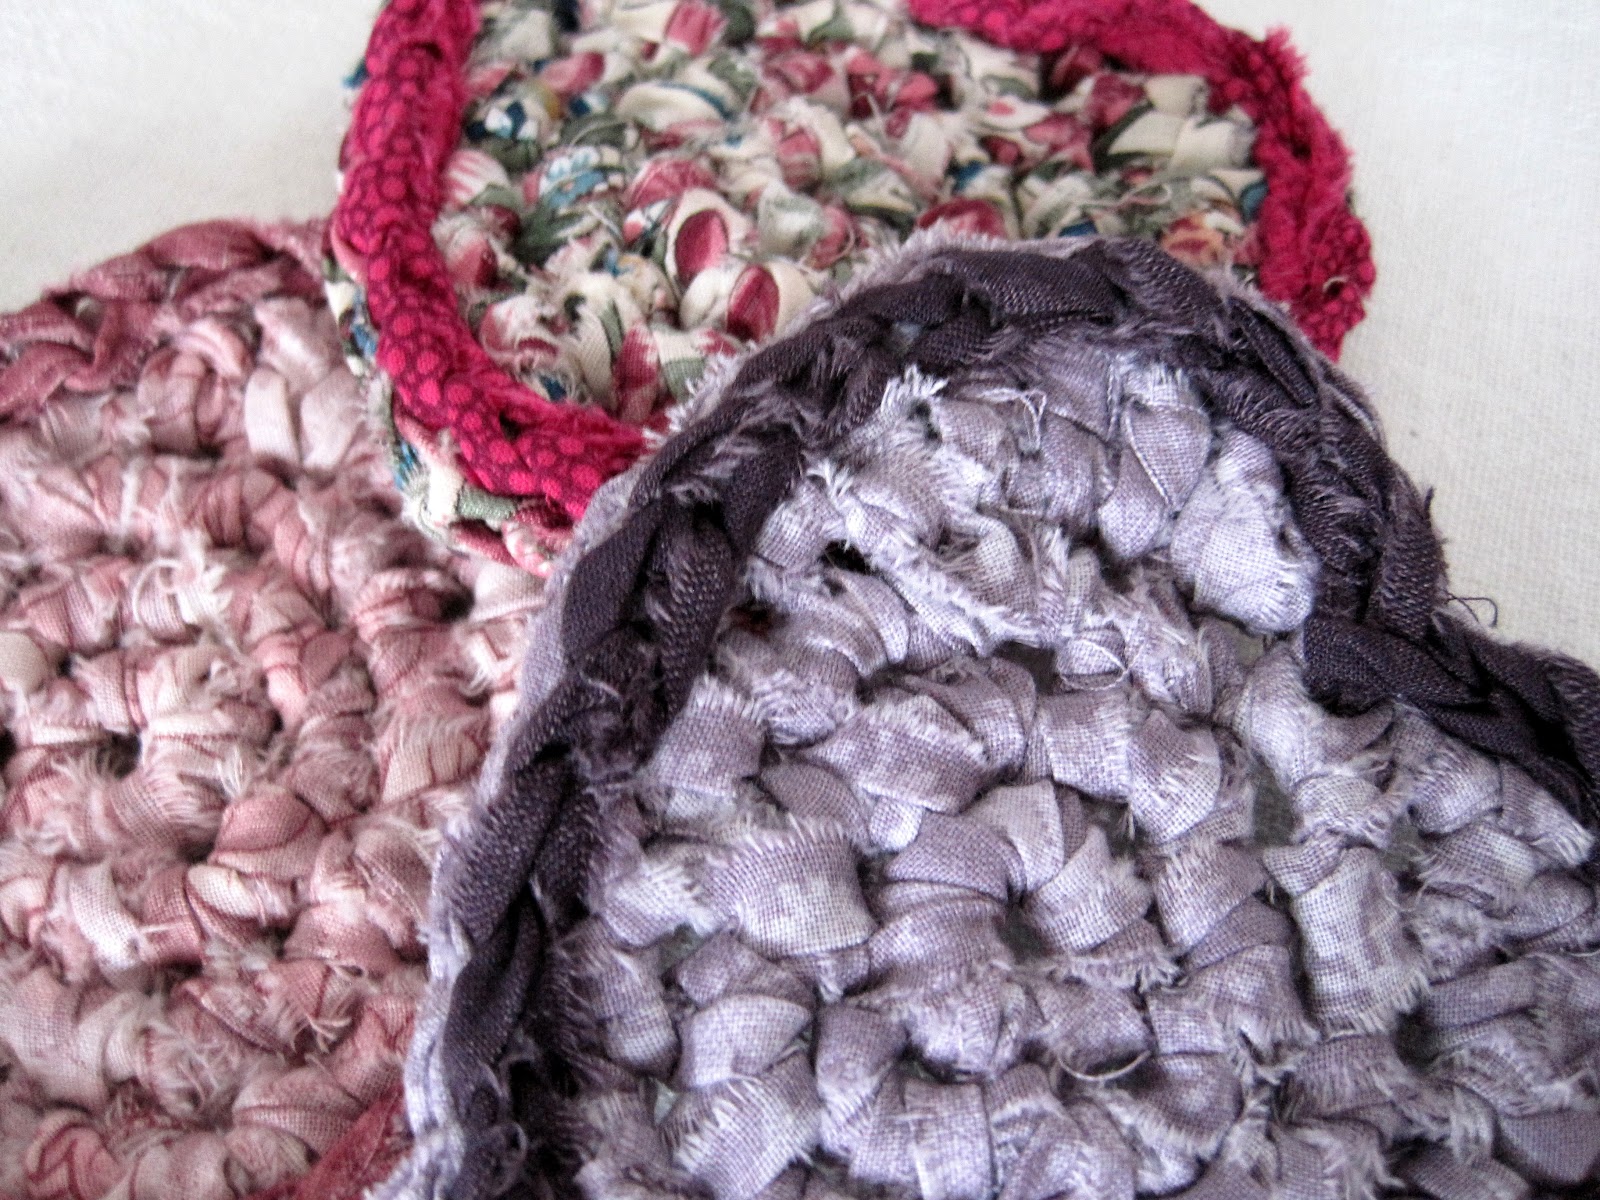
Raggedy Heart Coasters are worked in simple spiral rounds from torn strips of fabric. They're trimmed with a final round of contrast slip-stitch, which highlights their shape and gives a decorative edge (and helps shrink that fabric stash):


The trim is of course optional; plain heart coasters look pretty cute too:


Tips for choosing fabric for crochet coasters:
  • I like to use 100% cotton calico (stash depletion tactic), but any light- or medium-weight woven fabric will work well.
  • Strips cut on the cross-grain will have a tiny bit of stretch, and are slightly easier to crochet than strips cut on the lengthwise grain.
  • Remember that the wrong side of the fabric will show in some of your stitches. If you want a solid-colour coaster, choose a reversible fabric.
  • Large prints and designs will turn into small blotches of colour when translated into crochet; swatch with a single strip, to make sure you like the results, before tearing up your fabric.

Here's an example of the fabrics I used, and how they looked when crocheted:


(One advantage of crocheting with fabric strips: no need to press before tearing!)

Raggedy Heart Fabric Crochet Coasters

Finished Measurements: approximately 3½" to 3¾" at widest point

Materials:
~ Scrap fabric, less than 1/4  yard x 42" wide per coaster (you'll be joining the torn strips before crocheting, so the wider or longer your fabric is, the fewer joins you'll have to make)
~ Crochet hook, US size K/6.5mm
~ Smaller crochet hook for weaving in ends
~ Scissors

Making a Straight Edge
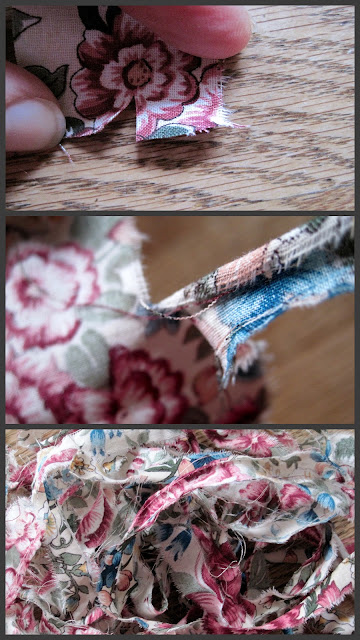
Chances are your fabric edge is not perfectly straight; to keep your coasters from stretching out of shape, it's best to work with fabric strips that are true to the fabric's grain.

To get that first straight edge, make a snip in the selvage end of the fabric, about 1/2" away from the existing edge. Tear the fabric all the way across to the other edge. (It's okay if the fabric sheds some long loose threads from the torn edge; just pull or snip them off.)

If your fabric edge is really off-grain, you may not reach the other edge with your first tear. If this happens, start again from the opposite edge (the one you were trying to reach with your first tear); make a small snip and tear across from there.

Making the Strips
To make your strips, snip about 1/2" away from your new straight edge, and tear all the way across. Repeat until you have about 8 yards of strips. (If your fabric is 42" wide, 7 strips should be enough for one coaster.)

Slightly skinnier strips will make a smaller coaster; slightly wider strips will make a larger coaster (but they will also be harder to crochet).

Making the torn strips

Joining the Strips
Fold under about 3/8" on each long skinny end; make a small lengthwise cut through the fold, but don't cut all the way to the edge of the strip.

With right sides facing up, insert the end of one strip (we'll call this Strip A) through the slit of another (we'll call it Strip B). Now take Strip A's other end and feed it through through the slit at the nearer end of Strip A, forming a loop around the end of Strip B. Gently tighten the loop to bring the ends of Strip A and Strip B together, then gently pull on both until the join looks like the lower right photo below:


Joining the Strips

Crocheting the Heart

Notes:
  • Keep a relaxed tension. The best way to do this is by drawing up a generous loop at the base of each single crochet.
  • Use a cushioned hook, and/or rest your hands regularly. Crocheting with fabric can be hard on the wrists.
  • Heart is worked right side facing at all times.
  • Make sure all joins are hidden on the wrong side of the coaster OR between stitches.
  • If a join shows up on the front of a stitch, frog a few stitches, then re-work them with either looser or tighter tension. This will shift the join's position and allow you to hide it. (You might have to frog and re-work a few times to get the join where you want it.)


Make a magic ring and chain 1, OR Knotless Chain 2.
Round 1: Single crochet 6 in ring (do not tighten ring yet).
Round 2: Make 2 single crochets in each single crochet = 12 stitches. (Now you can tighten up the ring. Pull firmly and steadily on the fabric tail to close the hole.)
Round 3: [2 single crochets in the next stitch, 1 single crochet in the next stitch] 6 times around = 18 stitches.
Round 4: Single crochet in each of the next 4 stitches,
[single crochet, chain 1, single crochet] in the next stitch (this is the bottom point of the heart),
single crochet in each of the next 4 stitches,
[hdc, dc] in next stitch,
2 dc in each of next 2 stitches,
hdc in next stitch,
chain 1,
insert hook through center of next single crochet, slip stitch 1,
chain 1,
hdc in next stitch,
2 dc in each of next 2 stitches,
[dc, hdc] in next stitch.

Cut fabric strip, leaving about 3" tail. Skip next single crochet and Invisible Join to 2nd single crochet stitch of Round 4. Weave in ends by using small hook to pull fabric tails under surrounding stitches.

To make a round coaster, omit Round 4 and work another single crochet round, increasing every 3rd stitch.

Adding Contrast Trim
For contrast trim, you'll need about 60" of strips.

Insert hook from front to back through any stitch on the side of the heart, and pull up a loop of the contrast trim. Insert hook through next stitch, yarn over and pull loop through stitch and loop on hook. (This is also known as making a slip stitch.) :)

Slip stitch all the way around the heart, being careful to follow the dent at the center top and the point at the bottom.

When you have 1 stitch left, cut the fabric strip and join to the first slip stitch with an invisible join (join will cover the empty stitch). Pull the yarn tail through to the back and knot it with the beginning tail. Weave in ends as before.


You may do whatever you like with the items you make from this pattern, but you may not sell the pattern or reproduce the text without permission. (Links to this post are welcome.)

If you have any questions about this pattern, or find any mistakes (it happens all the time), don't be shy: ask or tell in the comment box below, or contact me in Ravelry (where I'm MrsMicawber).

Thanks for viewing, and happy crocheting!

~ ~ ~

An Overdue Bit of News:

Dana Bincer of Interweave has been hosting a CAL of my Ghost Cone Scarf pattern (from the Interweave Crochet Winter 2013 issue). You can find her blog post here, and the Ravelry CAL page here.

(Sorry I forgot to post about this before, Dana!)

:)


~ ~ ~ ~ ~ ~ ~ ~ ~ ~ ~ ~

Wednesday, February 3, 2016

Mostly About Mittens

A mini-blizzard blew through yesterday, first pelting us with several inches of icy white stuff, then dripping hours' worth of freezing rain that pocked and scoured off much of the snow that just fallen. Sometime during the night, the rain turned back into snow, and we woke to a fresh snowfall this morning.

The media hype leading up to this event was rather overblown (ha! weather pun!); words of panic and fear flew about more thickly than did the snow at the height of the storm. I do love Wisconsin in the wintertime. :)


~

In other news, the Socks of Doom, having languished on a side table while I knit a pair of mittens with the leftover yarn, are ready and eager to be mailed.

Doom? Us?

It feels as though I've been working on these two projects (socks and mittens) for a small lifetime, though it's only been about six or seven weeks of Sundays. Stranded colourwork, I find, requires a quiet atmosphere and long stretches of free time; if I try to squeeze it in between other jobs, the knitting suffers. (Not that knitting ever goes smoothly for me, even at the best of times....)

Unlike the Socks, the mittens came together fairly easily. To honour the giftee and her Norwegian heritage, I'm naming them Nikki's Nordic Mittens.


Nikki's Nordic Mittens are based on the Generic Norwegian Mitten Pattern by Adrian Bizilia. I used 3x3 rib for the cuffs, then did 2 rows of purl stitch for texture before starting the colourwork pattern. The mitten back is done in a combination of motifs found online (I googled "Fair Isle motifs"); the palm is a diamond pattern, slightly widened to fit a multiple of 5 stitches.

I think I like the palms even better than the backs....

The afterthought thumbs were a new technique for me - a bit scary, but thanks to this post by A Kitten Knits and this post by Mary Jane Mucklestone they worked out beautifully (especially after some duplicate stitching at the corners to take care of the seemingly-inevitable gaps caused by picking up stitches).

Real stitch or duplicate stitch? Only the knitter knows....

For the sake of simplicity, I worked the thumbs as tubes (rather than flat and peaked like the mitten fronts and backs). It took a bit of thought to come up with decreases that would preserve the checkerboard pattern; I finally settled on paired ssk and k2g decreases which I worked on the underside of the thumb. There's probably a better way to hide decreases in very small pieces of stranded colourwork - if you know it, do please tell in the comments!

Checkerboard decreases (which sounds like the name of
a 70s soft-rock song)

I wasn't sure how to bind off the colourwork at the  mitten tips, so I just tied off the grey side bands, using the yarn tail to link the top two stitches, then worked a little blue bridge of Kitchener over the grey:


Bonus picture of mitten innards:


Knowing my own limitations, I chose worsted-weight yarn for these projects (rather along the lines of giving oversized crayons to the toddler who's just learning to write); even at that scale they posed quite a challenge. I really admire knitters who work stranded colourwork in finer-gauge yarns.

The Socks of Doom and Nikki's Nordic Mittens

Every so often I get bit by the knitting bug ... but I think the fever has now worked itself out. I'm ready to get back to crochet!

Next post: Valentine-y crochet coasters.

~

What are you working on?

~ ~ ~ ~ ~ ~ ~ ~ ~ ~ ~ ~